General Finishes Gel Stain Instructions: A Comprehensive Guide
Gel stain offers a unique approach to wood finishing, differing from traditional stains in its consistency and application. This guide provides detailed instructions, covering preparation, application, and protection, ensuring a beautiful and durable finish for your projects.
Understanding General Finishes Gel Stain
General Finishes Gel Stain is a specialized wood finishing product renowned for its unique properties and ease of use. Unlike conventional liquid wood stains, gel stain boasts a thicker, gel-like consistency, making it exceptionally user-friendly, particularly for both novice and experienced woodworkers. This formulation allows for greater control during application, minimizing drips and runs, and providing a more even coating.
The oil-based nature of General Finishes Gel Stain contributes to its rich color saturation and ability to enhance the natural beauty of wood grain. It’s particularly effective on challenging wood types like veneer, plastic laminate, and previously finished surfaces, where traditional stains often struggle to penetrate and adhere effectively. The gel consistency essentially ‘sits’ on the surface, delivering color without relying on deep penetration.
Furthermore, General Finishes offers an extensive palette of colors, ranging from classic wood tones to vibrant, contemporary shades, allowing for a wide range of creative possibilities. While generally a bit more expensive than traditional stains, the benefits of easier application, superior coverage, and versatility often justify the investment. Understanding these core characteristics is crucial for successful application and achieving professional-looking results.
What is Gel Stain and Why Choose It?
Gel stain is a unique wood finishing product distinguished by its non-drip, gel-like consistency, differing significantly from traditional liquid wood stains. This innovative formulation makes it an excellent choice for a variety of projects, especially for those seeking a simplified application process and consistent results. It’s an oil-based stain, offering rich color and enhancing wood grain beautifully.
Choosing gel stain offers several advantages. Its thicker viscosity minimizes the risk of drips and runs, making it ideal for vertical surfaces or intricate designs. It excels on difficult-to-stain woods like veneer, plastic laminate, and previously finished surfaces, providing color where traditional stains may fail. Gel stain doesn’t require extensive sanding for adhesion, saving time and effort.
Moreover, gel stain provides excellent coverage, often requiring fewer coats to achieve the desired color intensity. While potentially costing slightly more upfront, the ease of use and reduced material waste can offset this expense. It’s a fantastic option for DIY enthusiasts and seasoned woodworkers alike, delivering a professional finish with less hassle.
Gel Stain vs. Traditional Wood Stain: Key Differences
While both gel stain and traditional wood stain aim to color and enhance wood, their compositions and application methods differ significantly. Traditional stains are typically liquid-based, penetrating the wood pores to impart color. Gel stains, conversely, sit more on the surface, creating color through pigment deposition, making them suitable for non-porous surfaces.
A key distinction lies in viscosity. Traditional stains are thin and prone to dripping, requiring careful application and quick wiping. Gel stain’s thicker consistency offers greater control, minimizing drips and allowing for easier application on vertical surfaces. This also impacts preparation; traditional stains often necessitate thorough sanding for optimal penetration, while gel stain can adhere to less-prepared surfaces.
Coverage is another differentiator. Gel stain generally provides more opaque coverage, often requiring fewer coats to achieve the desired color. Traditional stains, being more transparent, may need multiple applications to build color intensity. Finally, gel stains are often favored for their ability to effectively color previously finished wood, a challenge for traditional stains.
Preparation is Key: Before You Begin
Proper preparation ensures optimal gel stain adhesion and a professional finish. Thoroughly cleaning and sanding the wood surface is crucial, alongside selecting the correct color and gathering all necessary tools.
Surface Preparation: Cleaning and Sanding
Effective surface preparation is paramount for successful gel stain application. Begin by meticulously cleaning the wood to remove any existing finishes, dirt, grease, or contaminants. A strong degreaser or mineral spirits can be utilized, followed by a thorough rinsing with water and allowing it to completely dry.
Next, sanding is essential to create a smooth, receptive surface. Start with a coarser grit sandpaper (around 80-120) to remove old finishes or imperfections. Progress to finer grits (150-180, then 220) to refine the surface and open the wood pores for better stain absorption. Always sand with the grain to avoid unsightly scratches.
After sanding, remove all sanding dust using a vacuum cleaner with a brush attachment, followed by a tack cloth. This ensures a pristine surface free of particles that could interfere with the stain. For previously finished surfaces, ensure all traces of the old finish are removed before proceeding. A properly prepared surface guarantees even stain penetration and a beautiful, lasting finish. Remember, the time invested in preparation directly correlates to the quality of the final result.
Choosing the Right Gel Stain Color
Selecting the ideal gel stain color is a crucial step in achieving your desired aesthetic. General Finishes offers a wide spectrum of colors, ranging from natural wood tones to vibrant, contemporary shades. Consider the existing décor and the overall style you wish to create.
Before committing to a full application, always test the stain color on an inconspicuous area or a scrap piece of the same wood species. Gel stain colors can appear different depending on the wood type, grain pattern, and the number of coats applied. Apply a sample coat, allow it to dry completely, and evaluate the result in various lighting conditions.

Remember that gel stains tend to deposit more color than traditional stains, so start with a lighter shade if you’re unsure. You can always build up the color with subsequent coats. Consider the undertones of the stain – warm tones (reds, yellows) create a cozy feel, while cool tones (blues, grays) offer a more modern look. Don’t hesitate to mix different gel stain colors to create a custom shade perfectly tailored to your project.
Gathering Your Tools and Materials
Proper preparation begins with assembling the necessary tools and materials for a smooth and efficient gel stain application. You’ll need General Finishes Gel Stain in your chosen color, of course! Beyond that, gather several lint-free cloths – old t-shirts work exceptionally well – for application and wiping off excess stain.
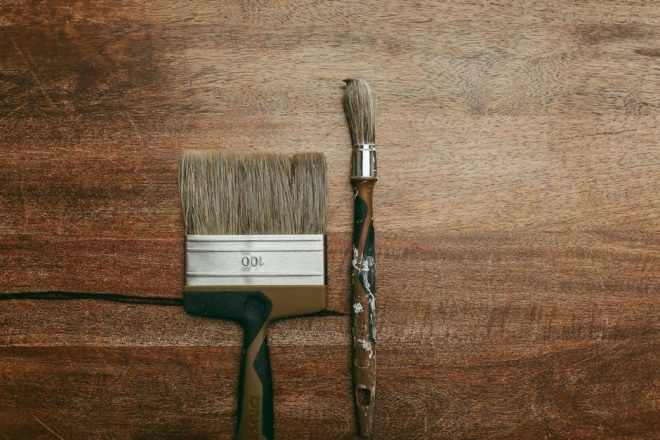
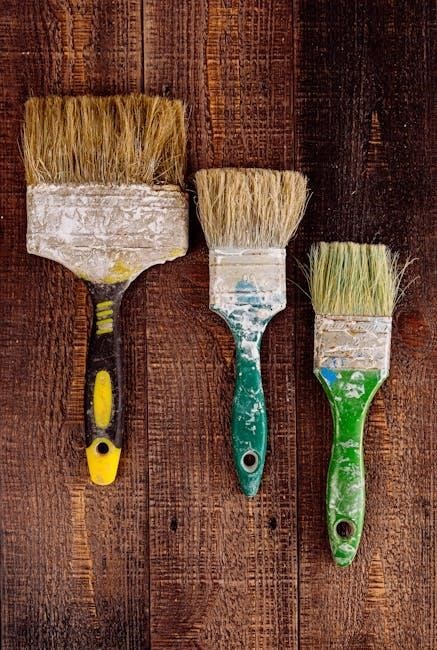
Essential tools include a quality synthetic brush, specifically designed for oil-based products, for applying the stain evenly. Sandpaper (various grits, typically 120-220) is vital for surface preparation. Safety gear is paramount: wear gloves to protect your hands and a respirator to avoid inhaling fumes.
Additional helpful items include a stir stick for thoroughly mixing the gel stain (as the pigments can settle), mineral spirits for cleaning brushes and tools, and a container for disposing of used cloths safely. Having a well-ventilated workspace is also crucial. Finally, consider having a tack cloth on hand to remove any lingering dust particles before staining.
Application Techniques: Step-by-Step
Gel stain application differs from traditional stains. Apply a generous, even coat with a brush or cloth, working with the wood grain. Immediate wiping removes excess, controlling color intensity and achieving desired results.
Applying the First Coat of Gel Stain
Begin with a clean, sanded surface, as proper preparation is crucial for optimal adhesion and a flawless finish. When applying the first coat of General Finishes Gel Stain, remember that it behaves differently than traditional liquid stains. Due to its thicker consistency, application methods vary slightly.
You can utilize a variety of tools, including a high-quality natural bristle brush, a foam brush, or even a lint-free cloth. A brush is ideal for intricate details or larger, flat surfaces, allowing for controlled application. A cloth provides a more even, subtle application, particularly useful for achieving a weathered or distressed look.
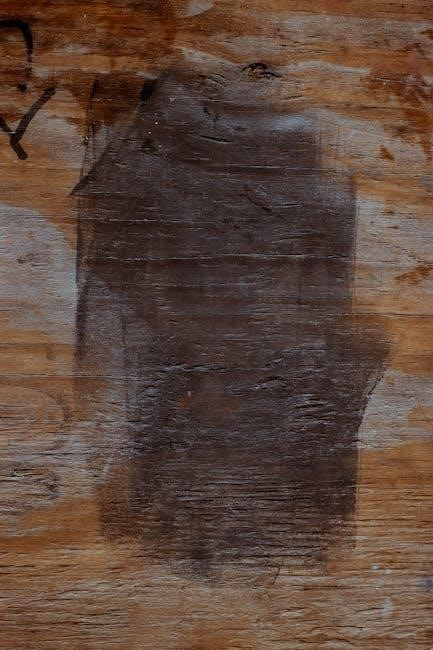
Apply the gel stain liberally, working with the wood grain. Don’t be afraid to use a generous amount; gel stain doesn’t penetrate as deeply as liquid stains, so a thicker initial coat is often beneficial. Ensure complete coverage, paying attention to corners and edges. The goal is to coat the entire surface evenly, establishing a base for subsequent coats or the final finish. Avoid overlapping excessively, as this can lead to uneven color saturation. Remember, this is the foundation of your project’s aesthetic, so take your time and apply with care.
Wiping Off Excess Stain: Timing and Technique
Timing is paramount when removing excess General Finishes Gel Stain. Unlike traditional stains, gel stain sits more on the surface, requiring a precise wiping technique. Allow the stain to penetrate for a short period – typically between 5 to 15 minutes – but monitor closely. The ideal timeframe depends on the wood species, temperature, and desired color intensity.
Utilize clean, lint-free cloths (old t-shirts work well!). Fold the cloth into a pad and gently wipe with the grain. Avoid circular motions, as these can create swirl marks. Apply light pressure, focusing on removing the stain that hasn’t been absorbed by the wood. The goal isn’t to remove all the color, but to eliminate the excess sitting on the surface.
Frequently rotate to a clean section of the cloth to prevent re-depositing stain. For intricate areas, use smaller pieces of cloth or a soft brush to carefully wipe away excess. Inspect the surface under good lighting to ensure even coverage and identify any areas needing further attention. A second, light wipe can refine the color and remove any remaining residue.
Allowing for Drying Time
Proper drying time is crucial for a successful General Finishes Gel Stain application. Unlike penetrating stains, gel stain forms more of a film on the wood surface, requiring adequate time to fully cure. Generally, allow at least 6-8 hours for the first coat to dry to the touch, but 24-48 hours is highly recommended before applying subsequent coats or a topcoat.

Environmental factors significantly impact drying time. Higher humidity and lower temperatures will extend the drying process. Ensure good ventilation in the workspace to facilitate proper evaporation of the oils within the gel stain. Avoid placing items on the stained surface or disturbing it during the drying period to prevent smudging or imperfections.
To test for dryness, gently press a clean finger onto an inconspicuous area. If no stain transfers to your finger, it’s likely dry enough to proceed. Patience is key; rushing this step can lead to a tacky finish or adhesion problems with the topcoat. Following the recommended drying times ensures optimal results and a durable, beautiful finish.
Achieving the Desired Finish
Gel stain allows for buildable color, enabling you to customize the shade. Multiple coats deepen the tone, while careful application and wiping techniques control the final appearance and achieve your vision.
Applying Subsequent Coats (If Needed)
Determining if a second coat of General Finishes Gel Stain is necessary depends entirely on the desired color intensity and the initial result. After the first coat has fully dried – typically 6-8 hours, but always check the product label – assess the color saturation. If the hue appears too light or lacks the depth you’re aiming for, a second application is recommended.
Before applying the second coat, lightly scuff the surface with very fine sandpaper (220-grit or higher). This creates a mechanical bond for better adhesion. Remove all sanding dust thoroughly with a tack cloth. Apply the second coat using the same technique as the first: a small amount of stain applied with a brush, foam applicator, or lint-free cloth, working with the wood grain.
Remember, gel stain builds color with each coat. Therefore, apply thin, even layers. Avoid heavy application, as this can lead to uneven drying and potential lap marks. Wipe off excess stain promptly, again following the grain. Allow each coat to dry completely before considering further applications. Typically, two coats are sufficient, but some projects may benefit from a third, especially when working with porous woods or aiming for a very dark finish. Patience is key to achieving a professional-looking result.
Troubleshooting: Common Application Issues
Even with careful preparation and application, issues can arise when using General Finishes Gel Stain. One common problem is tackiness – often caused by applying too much stain or insufficient drying time. Ensure proper ventilation and allow ample drying between coats. If tacky, gently wipe with mineral spirits, then re-evaluate drying.

Another frequent concern is uneven color absorption, particularly on softwoods. This can be mitigated by applying a wood conditioner before staining. Lap marks, visible lines where overlapping strokes occur, are usually due to inconsistent wiping. Maintain a wet edge and wipe in the direction of the grain, overlapping slightly.
If the stain appears muddy or dull, it might be due to contamination on the surface or using an incompatible topcoat. Always clean the surface thoroughly before staining and choose a topcoat specifically designed for oil-based stains. Finally, if the color isn’t as expected, remember gel stain builds in layers; a second coat can often correct the issue. Always test in an inconspicuous area first!
Dealing with Streaks and Uneven Color
Streaks and uneven color are common challenges when applying General Finishes Gel Stain, but are often easily remedied. The primary cause is typically inconsistent application or wiping technique. Ensure you’re working in even, overlapping strokes, maintaining a ‘wet edge’ to prevent lap marks. Apply gentle, consistent pressure throughout the process.
If streaks appear after the first coat, allow the stain to dry completely – usually 6-8 hours – before addressing them. Lightly sand the affected areas with very fine grit sandpaper (220 or higher) to blend the color. Avoid sanding through the stain entirely. Then, apply a second, thin coat, focusing on the streaked areas.
Uneven absorption, especially on porous woods, can also contribute to color variations. A wood conditioner applied before staining helps equalize absorption. For stubborn streaks, consider using a gel stain retarder to slow drying and allow for more working time. Remember to test any corrective measures in an inconspicuous area first to ensure compatibility and desired results.

Protecting Your Finish: Topcoats and Sealers
Topcoats and sealers are crucial for safeguarding your gel stained surface. They enhance durability, resist scratches, and provide protection against moisture and UV damage, ensuring a lasting, beautiful finish.
Choosing the Right Topcoat for Gel Stain

Selecting the appropriate topcoat is paramount to protecting your newly gel-stained wood surface and achieving the desired aesthetic. Several options exist, each offering unique benefits depending on your project’s needs and intended use. Polyurethane is a popular choice, known for its exceptional durability and resistance to abrasion, making it ideal for high-traffic surfaces like floors and tabletops.
Polyurethane comes in both oil-based and water-based formulas. Oil-based polyurethane provides a warmer, more amber tone and generally offers superior durability, but it has a stronger odor and longer drying time. Water-based polyurethane is lower in VOCs, dries quickly, and remains clearer, preserving the true color of the gel stain.
Lacquer is another excellent option, particularly for furniture. It provides a fast-drying, smooth finish, but it’s generally less durable than polyurethane and may require more coats. Shellac is a natural resin that offers a beautiful, warm glow and is easy to repair, but it’s less water-resistant and suitable for items with limited exposure to moisture. Finally, wax can provide a soft, satin sheen and a tactile feel, but it offers minimal protection and requires regular reapplication. Consider the level of protection, desired sheen, and ease of application when making your selection.
Applying the Topcoat: Ensuring Durability
Proper topcoat application is crucial for maximizing the longevity and beauty of your gel-stained finish. Begin with a clean, dust-free surface; a tack cloth is invaluable for removing any lingering particles. Apply the topcoat in thin, even coats, using a high-quality brush, foam applicator, or spray equipment, following the manufacturer’s instructions.
Avoid applying the topcoat too thickly, as this can lead to runs, drips, and an uneven finish. Allow each coat to dry completely before applying the next, lightly sanding between coats with fine-grit sandpaper (typically 220-grit or higher) to create a smooth surface for adhesion. This “sanding between coats” step is vital for a professional-looking result.
Generally, two to three coats of topcoat are recommended for adequate protection, especially for surfaces subject to wear and tear. Ensure proper ventilation during application and drying, particularly with oil-based products. After the final coat has fully cured, allow several days for the finish to harden completely before placing items on the surface or subjecting it to heavy use. This patience will significantly enhance the durability of your project.
Maintenance and Care of Gel Stained Surfaces
Maintaining a gel-stained surface is generally straightforward, focusing on gentle cleaning and preventative measures. Avoid harsh chemicals, abrasive cleaners, and excessive water, as these can damage the finish. Regular dusting with a soft cloth is usually sufficient to remove everyday dirt and debris.
For more thorough cleaning, use a damp (not wet!) cloth with a mild soap solution, such as dish soap diluted in water. Wipe in the direction of the wood grain and immediately dry with a clean cloth. Avoid letting water pool on the surface. Periodically, you can apply a furniture polish specifically designed for finished wood to help restore shine and provide a protective layer.
To prevent damage, use coasters under drinks, placemats under hot dishes, and felt pads under furniture legs. Avoid placing gel-stained items in direct sunlight for extended periods, as this can cause fading. With proper care, your gel-stained surface will retain its beauty and durability for years to come, offering lasting enjoyment.